Classes!
I moved from operating Earth Cadets in the basement of my house this year to a larger studio in North Center with a couple goals in mind. A major one was to resume teaching classes. I taught screen printing and surface design...
I moved from operating Earth Cadets in the basement of my house this year to a larger studio in North Center with a couple goals in mind. A major one was to resume teaching classes. I taught screen printing and surface design...

We are doing some major (huge) spring cleaning in the studio and have marked down all existing inventory 25-50%.
To help us get the word out, we are asking our Instagram friends to spread the word and share our sale post. In return, we will email a code FREE SHIPPING (good on sale AND full price/made to order items) for domestic purchases.
To get the FREE SHIPPING code
1) take a screen shot of Earth Cadets' posting regarding memorial day sale
2) Share image on your feed and tag @earthcadets along with #ecspringclean
3) If your account is private, email or send me an Instagram Direct Message with your screen shot of the shared posting and I'll respond with the code for FREE SHIPPING. Make sure to include your email address so I can send you the code.
Valid 5/22 - 5/26
Please get in touch with any questions.

When it comes to hand made, nobody's perfect, right? That's part of the beauty, that each piece is a little different than the last. I mean, we aren't robots or machines; we make things with love and intention. And with that comes mistakes! In my 6+ years of printing, I have made so so so many mistakes during the process from dropping a brick on my light table (WHAT?!) to smudgy fingers ruining a perfect print.
But lemonade out of lemons, right? I've printed less than perfect pieces of fabric that won't work for pillows but are too lovely to throw away that there must be SOME use for them. Enter bunting. The charming and whimsical party decor that doesn't need a party to make the day bright. This was a custom request from a lovely California customer and I think she might be on to something. So stay tuned for some of these fellas popping up in the shop; it will be the summer of bunting!


You guys. Have you met Manny?! He is only the most adorable French Bulldog in the world and he just so happens to live in my city (Chicago)!

The team over at Manny and Friends and I have partnered to offer Earth Cadets' illustrated organic pillow cases so even if you live across the country, you too can have a little Manny of your own to cuddle. These are limited edition, made to order by me (Krissy) 12"x12" pillow cases. They are available only until April 24th, so be sure to snag one up before they are gone for good!


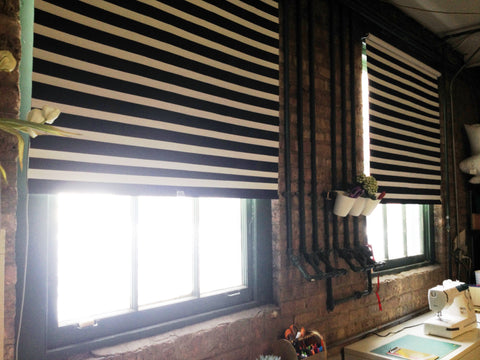
My new studio is full of windows, which is so amazing! My previous basement studio had one tiny ground level glass block that faced another apartment and a window that looked into our enclosed stairwell. 2014 coming up vitamin D!
The new studio windows face a courtyard and are covered with privacy decals allowing light in. But I have two giant widows that face the alley, and they are not covered so I was majorly lacking privacy at night. (The only back alley neighbor I met is a older man who reminds me of the next door neighbor in Home Alone - scraping shovel and all. While I am convinced we will some day be great friends, he will creep me out until then)
I went to pick up some of the Ikea Tupplur shades (which are $5 off until April 2). I chose the white 47" and knew I wanted to embellish them but didn't have a plan in mind. I am trying to keep the accents in the main part of the studio black and white because 1) it's classic and bold and 2) it goes with everything, so they will work great with all the crazy colors that will soon be splattering the floors and printing tables.
I highly recommend these shades as a blank canvas. They take latex paint and a roller well but also sharpies, so you could just write a love letter on these puppies and it would look amazing.
Here's how I did it myself:
Surface: It was really helpful to have my large printing tables to roll these out horizontally, but I think a dining room table would work. Also the shades I used were 47" and these come in a variety of sizes.
Supplies:
2 47" Tupplur shades, white
Black rustoleum latex paint
Painters tape 1.5" wide
3" mini roller
mini paint tray
4 chisel tip black sharpies
clear 6"w acrylic ruler
Project time: 6 hours for both shades
Step 1:
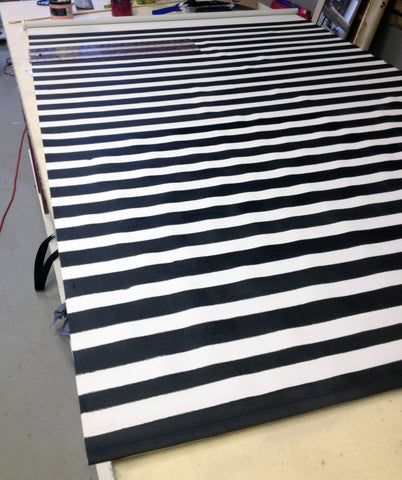
- Roll out shade on large surface. (make sure you place scrap paper or a tarp/sheet under shades if you don't want to get paint on your table)
- With painters tape, measure 5" down from the top of the shade. This sets a guide to measure off the stripes.
- Based on how thick you want the stripes, mark off with a sharpie where you want the next stripe to be. I used a 6"w x 26" clear acrylic ruler and marked every 3" all the way down.


Step 2:
- Place painters tape along the bottom of the sharpie line and make sure the tape is adhered to the shade. I rolled it flat using the tape roll to "iron" it down.


Step 3:
- Once all taped and ready to go, roll the paint, covering the shade. I applied two coats. Pull tape off following second coat.
- Let dry
- When I pulled up the tape I noticed it was the edges were bumpy and a little smudged. It looks more organic and painterly with the raw edged stripes, but I am a bit of a freak for clean edges. So I followed up each stripe using a fat chisel tip black sharpie and the acrylic ruler and that cleaned up the edges perfectly! But you could go either way and it would take much less time if you are ok with the raw edge look.


Step 4:
Hang and admire :)


